
With a random warm day I decided it was best to start on clearing up the rust on the van. I had last repainted all the way around the bottom of the van 3 years ago so this by far was the worst of the rust where a chip of paint was missing.
To start with a disclaimer this is not a great way to respray your van look at this as a good way to do spot repairs to keep the rust at bay. Unless you have a garage its best to stick to one panel at a time so you don’t end up not getting it done and having to leave bare metal out in the elements. Ideally you would pay the money and get it all treated and repainted but doing it this way you can keep to a very small budget.
For documenting this I will be repairing the front left arch on the wing and also the arch below the door I am just going to focus in on the wing as this is easy to mask of and do in one step.
As mentioned a stone chip had caused a large flake of paint to come off and at a distance the van looked really rusty because of it. I mask of the area around where I will be working as I do not want any stray sanding marks meaning I have to fix more than I initially want Using 120 grit sandpaper I sand through the rust down to bare metal and make sure any surrounding paint blends in not leaving and hard edges.


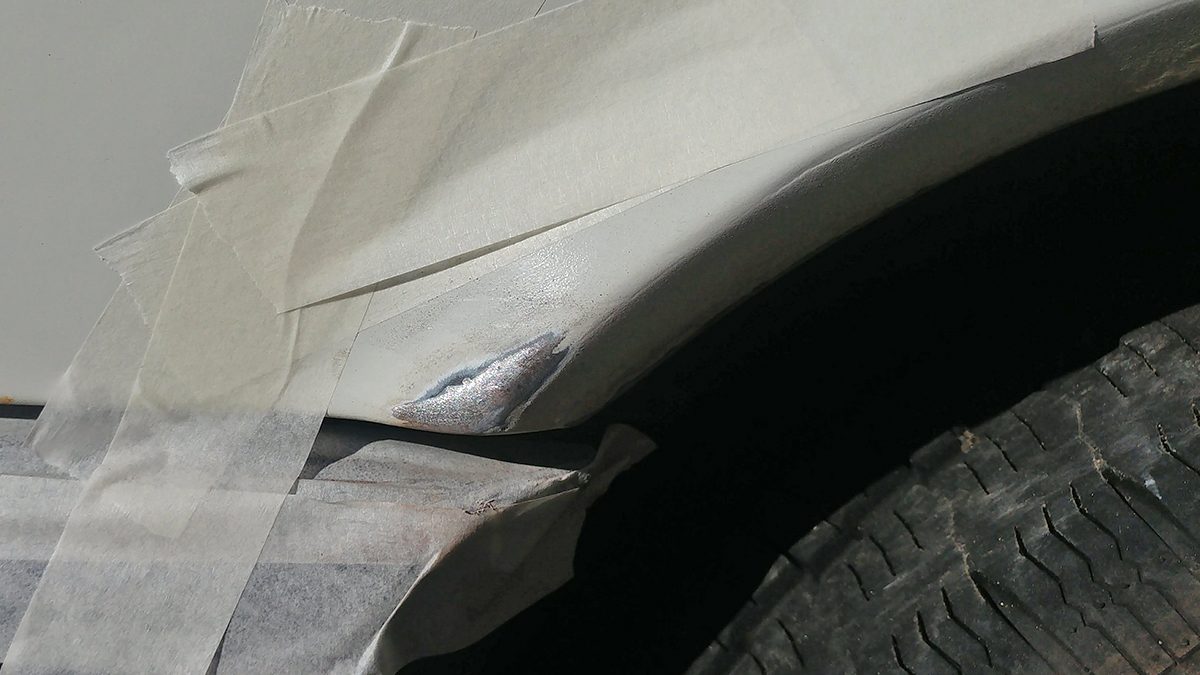
I can then use some rust converter as per instructions on your product to coat any remaining rust to prolong this fix. At this point if there a large pits left by the rust or any other problems your could use body filler to get the bodywork completely smooth. Once dry I scuff the entire masked area with a scotch pad and spray an etch primer over the bare metal, as its such a small area I just put a full coat of etch primer followed by three coats of white primer.


Removing the masking tape leaves us with the first part complete and the rust all removed prepped and covered.

As you can see you could have just put a top coat over the primer and this would be a good enough job just to smarten up the van and keep the rust away again for a few more years but I am going to move onto the steps to blend in some matching top coat. I start by wet sanding the primer with 400 grit sandpaper this gets rid of hard edges from the previous masking and smooths out any tiny bumps and lumps the primer has filled.


Once sanded again with 800 grit wet and dry right out onto the original paint where new paint will be I have used the edge in the body line and half way across the arch for my blend I can then start the masking ready for paint above you can see I have folded the masking tape in half what this does is instead of leaving a hard edge to the paint it will leave a soft edge which will be much easier to blend later on.
Once all masked and wiped down with some panel wipe I had to spray another coat of white primer to cover a few spots where the sanding had broken through to metal. I could then start with a light coat of topcoat and concentrating on hard to get edges like the back of the arch spray only the repaired area and not paint anywhere near the masking


The second coat was much heavier and again covered the hard to get area the repair and just a bit further out the panel but not to near the masking. Leaving the final coat to be quite heavy with a smooth finish and spraying nearly all the way out to the masking tape but again trying not to touch.

Once the paint has dried which can be tested with fingernail to see if still soft if it is wait else you will just fill it with sanding scratches. Below you will see the soft blend line half way through the panel.

Taking some 1200 grit wet and dry sandpaper you can sand the blend line into the old paint and into the new paint I have only sanded 5cm each way of the blend but you could wet sand all the new paint to remove orange peel or texture in the paint.

The blend should now have disappeared and the sanded area will be very dull. Last step is to use some rubbing compound to bring back the shine to the sanded area going over both the old and new paint to bring out the shine.


Leave a Reply